Thanks to Samuel our dear cousin and architect, we made it happen. I doubt I would have put it out without him. It was one big DIY!!
Wednesday, December 26, 2012
Our little Market
I hope that all of you had a beautiful Christmas with your love ones. Ours was very nice and Santa has been very generous with our daughters. As I was telling on my previous posts, I've been working on making the perfect little market for Sienna and Mia-Lou. I have to admit that it was a lot of work because it was made from scratch but oh so worth it. The girls play so well with it, and me with them ;-)
Thanks to Samuel our dear cousin and architect, we made it happen. I doubt I would have put it out without him. It was one big DIY!!
Thanks to Samuel our dear cousin and architect, we made it happen. I doubt I would have put it out without him. It was one big DIY!!
Monday, December 17, 2012
Monday DIY- Wool felt donut
Christmas is around the corner and I have a few more things to make for the girls market stand that I am building with the help of Sam. This past Sunday was rainy so I took some time to make a couple little donuts out of pure wool felt and I created a DIY at the same time so all of you can try to make your own. First I was very inspired by my last post, then, I found a tutorial on youtube. It was really fun to make. All photos by me.
Here are all the materials needed to make your donut. 2 sheets of wool felt in different shades. I only work with pure wool, no synthetic but I guess that you can use whatever you want. Different shade embroidery floss for the sprinkles, a pair of sharp scissors, a circle of paper as template (mine was 3"), some pin needles as well as a medium size needle and some wool for stuffing.
Step 1: Pin the paper circle to your first sheet of wool felt and cut around. Do the same thing for the other color. Ps: You will need two light circles of wool to make the two sides of your donut.
Step 2: Put two circles of wool felt on top of each other
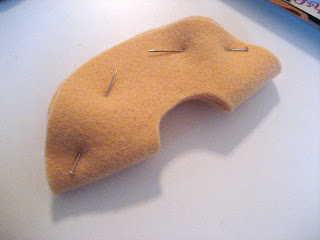
Step 3: Then fold in the center and pin them together leaving the center free for cutting. Cut the center as if you were cutting a circle. Your are now making the center of the donut.
Step 4: Repeat Step 2 and 3 with the darker felt using one of the felt circles that you just have made.
Step 5: Start by making a knot with the embroidery floss that matches the most your wool felt. Start stitching from the center, placing the knot inside the donut.
Step 6: Place both wool felt circles together and start stitching OVER the two layers.
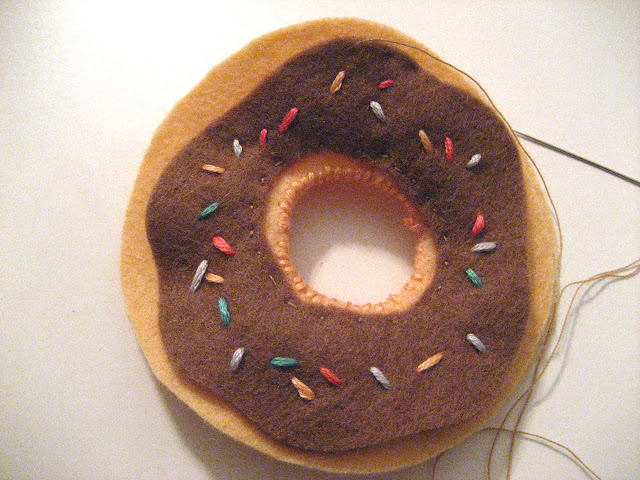
Step 7 & 8: Cut your darkest felt to imitate the icing shape and start sewing the sprinkles. You can use beads but I did it with the cotton instead. Make all knots on the hidden side of the felt.
Step 9: With a matching cotton thread start sewing the icing to the donut.
Step 10 & 11: Start stitching the outer part of the donut using the same OVER stitch as shown in Step 6. Leave a zone unstitched so you can stuff the donut. Here with pure wool.
Step 12: Finish stitching and make a knot. Cut thread right after knot.
Here is a picture of the back. Nothing's perfect in Handmade but that's why we appreciate it more. I do!
Taa-daa!!!
Wednesday, December 12, 2012
Mini Coffee Shop
What???? My heart just sank. I was on the amazing blog Amelie and Violet when I saw this unbelievable (HANDMADE!!) Coffee Shop. I am in the middle of making a market stand for my daughters and this coffee shop is so inspiring. I can't get over how awesome it is. Best play pretend toy I've seen so far.
Saturday, December 1, 2012
Our Advent Calendars (DIY)
This year, I promised my daughters that mommy will make them each an advent calendar. I was never too found of the sweets that you may find in certain calendars so I gave myself some time to think about what could replace the bites and as I was shopping in Manhattan Fashion district, I found some super cute charms and thought it was perfect. Here is the step by step. FYI: I WILL NOT SELL any of these calendars to the public. They are strictly made for my kids.
I used a black paper, some Archival white and silver ink, and some mini white clothes pins. All from Paper Source.
I selected some Hello Kitty Hair Clips, some charms and made around 10 pompoms with different wool colors.
Cut off some rectangles out of the black paper and folded them in the center then stamped them from 1 to 24.
I've sewn the sides to create a pouch.
Here stuffed with a wool pompom.
Then I've closed the pouch by sewing the top of the pouch. Don't forget to snip a side or your little ones won't be able to tear it.
To create a tree shape or whatever shape you want, I used a few push pins and a long thread of wool. Then, secured each pouch by attaching it to the thread using the mini clothe pins.
Here the outline of the star using the wool thread and the push pins.
Taa-daa!!!
The happy campers.
The Christmas countdown has started! Happy December everyone!!
Tuesday, November 27, 2012
Vintage kid's room
I have a big crush on vintage pieces here and there in a house but now, I may have a huge one on this bedroom. I can't believe how well it's been styled. The mini sewing machine and the wooden kitchen... So many details make my heart melt. I found it on a blog named Smile and Wave.
Subscribe to:
Posts (Atom)


